How to Transfer iPhone Pictures to iMac (macOS Catalina included)
By: Johanna Parker
Posted In: iPhone Tips & Tutorials
Have some good pictures on your iPhone and want to copy them to your Mac, so that you can view them on bigger screen or simply edit them in image editing software like Photoshop? Worry about that all pictures in your iPhone will be lost in case of accidental breakdown of the phone or if the iPhone gets lost? If yes, you are in the right place. We will show you two easy ways to transfer iPhone pictures to Mac:
Method 1 (a). Transfer iPhone photos to Mac using iPhoto
Note: iPhoto works only on iPhone pictures taken by your iPhone – In other words, you can only transfer pictures from your Camera Roll:
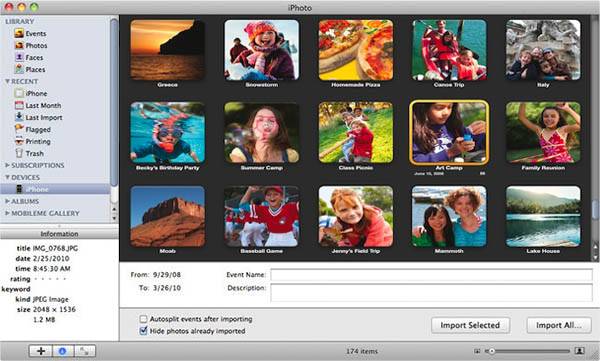
- Connect your iPhone to Mac. iPhoto will automatically open up with your iPhone device videos and images listed
- If you want to import all iPhone photos, click "Import All" button. To import selected images from your iPhone, click the "Import Selected" button
- Now, you will get a dialogue box asking you would like to delete the original pictures from your Camera Roll. Click “Delete Pictures” if you don’t want to keep on your iPhone anymore.
Method 1 (b). Import pictures from iPhone to Mac via Preview
If you do not have iPhoto you, can also use Preview option to transfer pictures from iPhone to iMac easily:
- Plug your iPhone into Mac and launch Preview
- From the file menu go to “Import from Phone” option
- Select photos and click “Import” or to import all the pictures click “Import All”
- Select the destination where you want save your photos.
You can also use Image Capture or iCloud Services (iOS 5.0 or above) to transfer pictures from iPhone to iMac.
Method 2: Copy or Transfer iPhone pictures to Mac with iPhone to Mac Transfer (iTransfer)
If you’re looking for a solution to import all your pictures from iPhone to Mac – not only your Camera Roll Photos then give a try to iPhone to Mac Transfer Tool. Apart from pictures, you can also use this tool to transfer music, video, eBooks, SMS, contact list from your iPhone to iMac and vice versa.

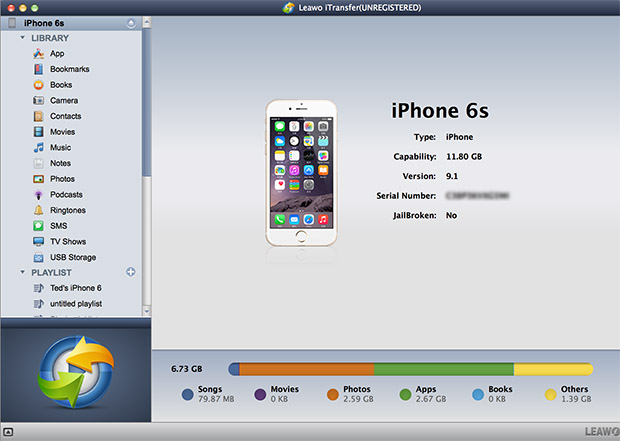
Step 1: Install and launch the program
After download and install, launch it on your Mac. Connect your iPhone to your Mac via lighting cable, program will automatically recognize your device and show the info as shown in the picture below:
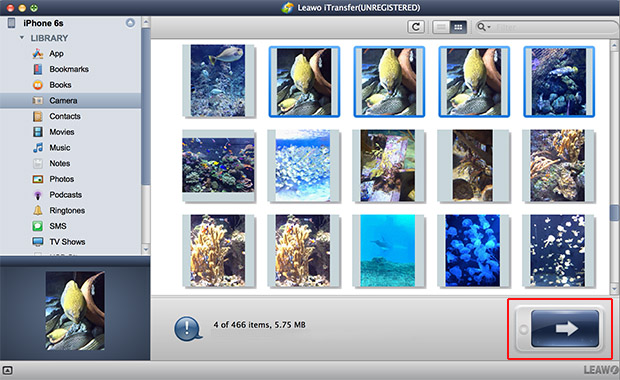
Step 2: Select the iPhone pictures and transfer to Mac
Now you need to click on "Camera" icon and select the photos that you want to transfer to your Mac using the Command key. Then click the “Transfer” button and choose "Save to Folder" option. In the end, click the “Start Transfer” button to start transferring the photos from iPhone to iMac. Alternatively, you can also select the photos that you want to transfer to your Mac, ctrl-click and choose "Transfer to My Computer" or go to File menu and choose "Transfer to My Computer".
Note: If you have photos on your iPhone other than your Camera Roll, they will appear in the "Photos" section of the program.
That’s it. Now, you can view all your iPhone pictures on Mac with original quality and output.
Windows Version
![]()
Awards & Accreditations
