How to Record Your iPhone or iPad Screen Using iOS Screen Recorder or QuickTime
By: Johanna ParkerPosted In: iPhone Tips & Tutorials
Remember when the iPhone first came out? Perhaps you can’t; perhaps you have only ever lived in an iPhone world! But when they were first made available, iPhones were literally the most impressive and astonishing piece of tech that we had ever seen, and even now they are still improving and refining the iPhone’s design – but Apple have forgotten (or purposefully chosen not to) enable screen recording on any of the iPhones. In fact, any app that is created to do so that is put into the Apple Store is immediately removed. They say that this is for security reasons, so that no one can watch you as you type your passwords or see your login details for important things such as online banking.

These are good reasons, but they do not take into account the many times when you may want to record your iPhone or iPad screen. Sometimes you may want to show a friend how a particular game works, or the high score that you’ve achieved. Any tech designer who is creating an app would find it very useful to create a tutorial by recording their screen. So how do you go about doing something that Apple specifically doesn’t want you to do, without needing to download some malware or suspicious looking app onto your phone?
Method 1: Record Video of Your iPhone or iPad Screen with iOS Screen Recorder Tool
You can use an app called iOS dr.fone toolkit to record your screen on iPhone or iPad. Firstly, you need to download and install this app on your Windows computer. After the installation is done, follow the steps below to get started.

Step 1: Connect your iPhone or iPad to same network your computer is using
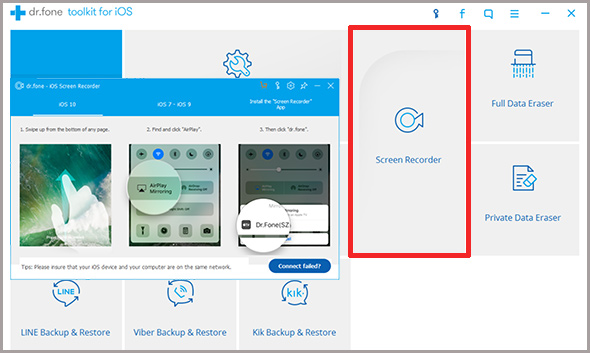
Launch the app on your computer. When it is ready, select “Screen Recorder” from the variety of options appear on your screen. You also need to connect your iOS device to the same LAN, or local area network, that your computer is using. This should be easy because you can use the same Wi-Fi connection, but if you are not using the same Wi-Fi connection then you should find the same local area network and connect both your computer and your Apple device to that.
Important: Make sure iTunes is installed on your computer. When you'll launch the app first time on your computer, you might see a security alert from your Windows Firewall. Click on "Allow Access" to let the iOS Screen Recorder app to communicate with your computer. Pressed the "Cancel" button by mistake? No problem. Go to Control Panel > Windows Firewall > Allowed Apps and click the "Change settings" and allow "ScreenReocrder" to communicate with your computer.
Step 2: Open AirPlay on your iPhone and choose Dr.Fone
If your Apple device is running iOS 10, slide your control center up like normal and then tap straight onto ‘AirPlay Mirroring’, and choose ‘iSky or dr.fone’. This will mirror your device on your computer screen. If your Apple device is running iOS 7, iOS 8, or iOS 9, then you will need to swipe up from the bottom of your device’s screen to open the control center. There you will see the option ‘AirPlay’. Tap it, choose ‘iSky or dr.fone’, and then enable mirroring by tapping the slider across.

Step 3: Start recording your iPhone screen
There are two buttons at the bottom of the software’s screen on your computer. The left circle button will start recording your iPhone or iPad screen, and when you are ready to stop recording, all you have to do is click on the right square button.
Any time that you want to leave full screen mode, you can press ESC on your keyboard or click the right square button again. When you’re finished recording, dr.fone will take you to the location on your computer where the video file is saved.
Note: If you don't see your iOS device screen on the user interface of this program then you need to disable the firewall in your Windows.
Method 2: How to Capture or Record Screen on iPhone/iPad with QuickTime (Macs only)
If you're a Mac user then you can use the QuickTime player to record the screen on your iOS device. Here are the steps that you need to follow:
Step 1: Before you start anything else, you will need to connect your iPhone or iPad to your Mac with its USB cable. When that is ready, you should start up QuickTime player. You can find this program in the Applications folder.
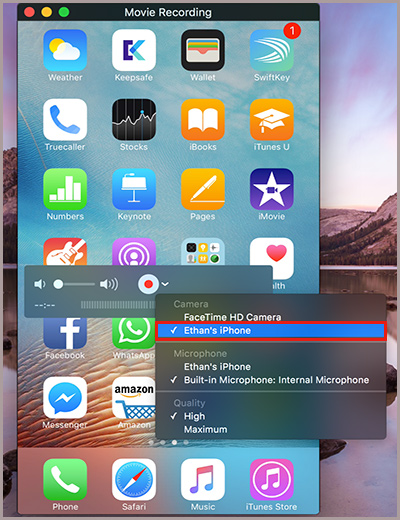
Step 2: With QuickTime running on your Mac, go to the toolbar and click on ‘File’, and then ‘New Movie Recording’. A video recording screen will appear on your screen. Make sure that your mouse is within the recording window, and the different record and volume options will appear. There is a little arrow just to the left of the big red record circle – click it, and you will see that you can choose what to record from.
Step 3: Choose your device name from this list, and make sure that the microphone that is chosen is also from your Apple device. QuickTime Movie Recording should now be showing your iPhone or iPad’s screen on your Mac, and you can start recording from it whenever you want to. We would recommend that you unlock your home screen first, and open up any of the apps that you want to record in case they are slow to open.
Step 4: When you are ready to start recording, click on the large red circle button on your Mac, and it will start recording everything that you do on your iPhone or iPad. When you are ready to stop recording, you can press the Stop button that you will find on the top right menu on your Mac, or move the mouse over the video and select the Stop button
Step 5: After pressing the stop button, you can now trim the video in QuickTime if you want to cut out some parts from the recorded video, else you can go to ‘File’ and click on ‘Save’ to save the recording on your Mac.
Other Useful Products
Awards & Accreditations