How to Transfer Viber Chats from Older Android Versions to iPhone
By: Johanna Parker
Posted In: iPhone Tips & Tutorials
Updated On: June 13, 2020
If you are using an Android device running Android 9 or older Android version including Android 8, 7 or 6, then you will need to follow these instructions to transfer Viber messages and media from your Android to iPhone. Remember these instructions won't work on the Android devices running Android 10, 11 or later versions. Just download the software as per the operating system you are using and follow these 9 steps to transfer Viber messages from Android to your iPhone:
|
|

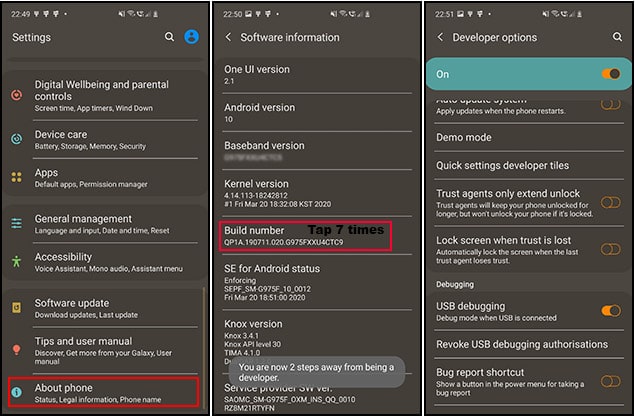
Step 1a: Enable USB Debugging mode on Android
First of all, you will need to turn on a mode called USB Debugging on your Android. To do this, go to Settings > Developer options and toggle the USB debugging option. If Developer options are not visible in the "Settings" menu, then navigate to Settings > About Phone > Software information and tap on Build Number (7) times untill you see a short pop-up saying "You are now a developer" or "Developer mode has been enabled".
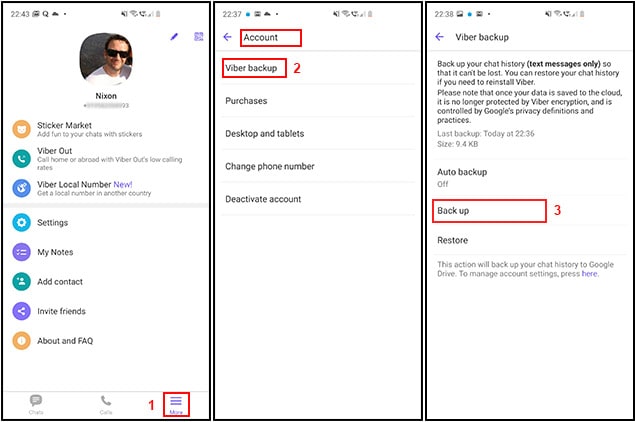
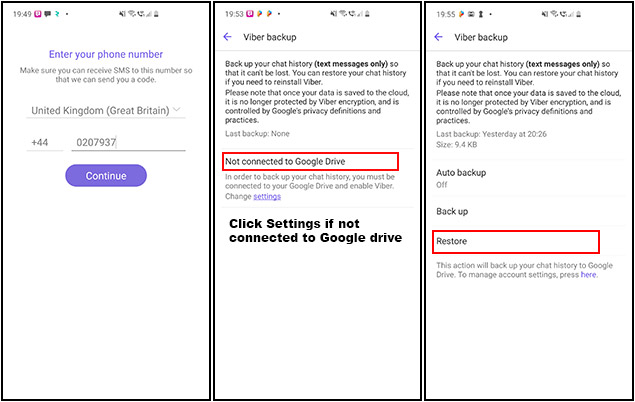
Step 1b: Backup your Viber messages to Google Drive
Next, you should backup your Viber chats and media to Google Drive. This can be done by going to More > Account > Viber backup > Back up. You might first need to sign in to your Google account before you backup your chats to Google Drive.
Step 2: Connect Android device to your computer and open the software
After backing-up your Viber chats to Google Drive, connect your Android phone to your computer with a USB cable and run the Android Viber to iPhone Transfer app.
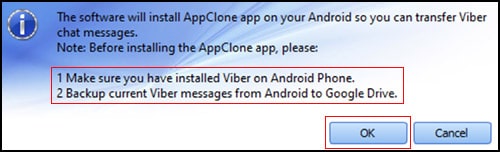
Step 3: Let the software insall "VB Sync" and "AppClone" app on your Android
Follow the on-screen prompts on your Android and allow the software to install an app called "VB Sync" on your Android device. If you miss the on-screen prompts and get some error, then disconnect and reconnect the Android device to your computer.
Next, software will install another app called "AppClone (also known as Parallel Space)" on your Android device.
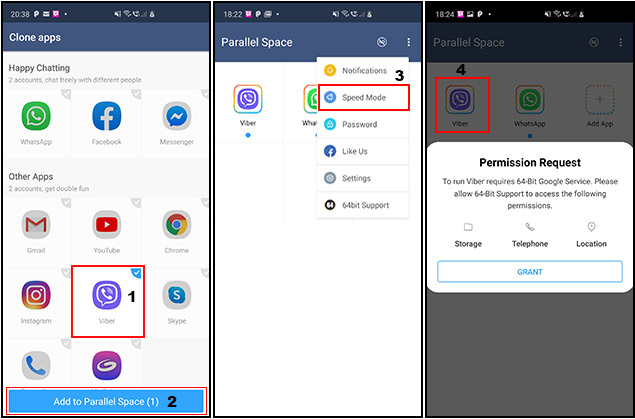
Step 4: Run Viber inside the AppClone application
The next step is to launch the AppClone on Android and add the Viber messenger to parallel space by tapping on the "Add to Parallel Space" button. Finally, disable the "Speed Mode" of the AppClone and click on "Viber" icon so that you can run the 2nd copy of Viber within the AppClone app.
Step 5: Log in to your Viber account and restore chats from the Google Drive
After running Viber via AppClone, you need to verify your phone number and restore Viber chats from the backup you've made in step 1b. by going to More > Account > Viber backup > Restore. After restoring the chat, go back to the software and press "OK" button. Software will load your Viber chats onto its interace within few minutes.
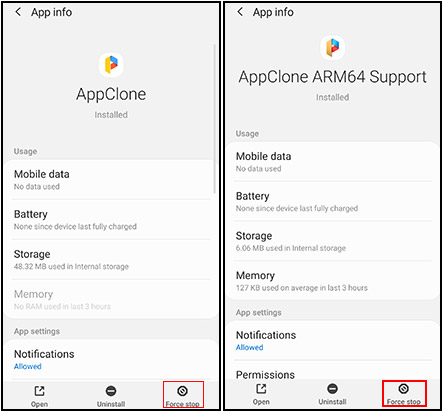
Important: If you encounter any issues while restoring the Viber chats from the Google Drive backup with AppClone, then please perform the following tasks:
- Go to Settings > Apps > AppClone and then tap on "Force Stop" to forcefully shut the app.
- Go to Settings > Apps > AppClone ARM 64 Support (if it's installed on your phone) and tap "Force Stop."
- Run the AppClone on your Android device again and restore the chats from the backup.
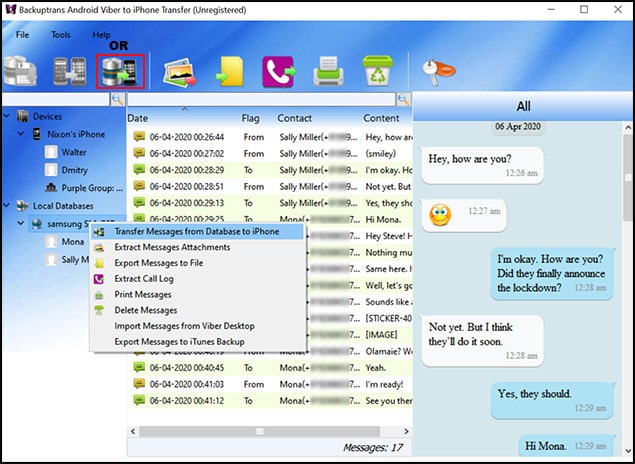
Step 6: Transfer Viber messages from your Android to your computer
Now, you need to right-click on your Android device that is displaying on the program interface and select "Backup Messages" option or go to "File" menu and select "Backup Messages" option. Your Viber chats will be exported from your Android to a local database.

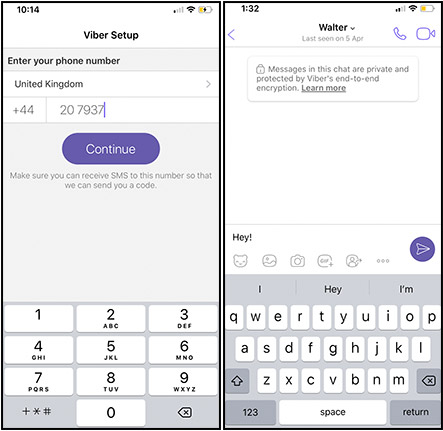
Step 7a: Download Viber on iPhone and verify your phone number
Now, go straight to the App Store and download the Viber app on your iPhone and verify your phone number if you haven't done so already. It is advisable to use the same number on the iPhone that was previously used on the Android device to create the Viber account. Next, open any Viber contact on your iPhone and send any messages such as "Hello" to that Viber contact.
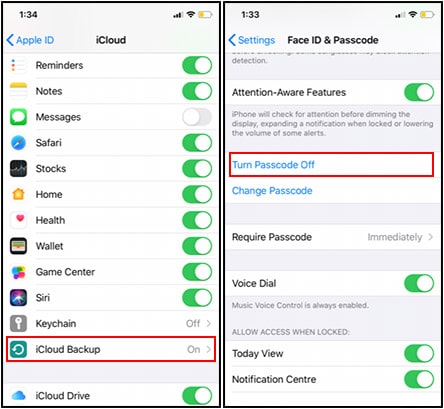
Step 7b: Prepare your iPhone for transfer
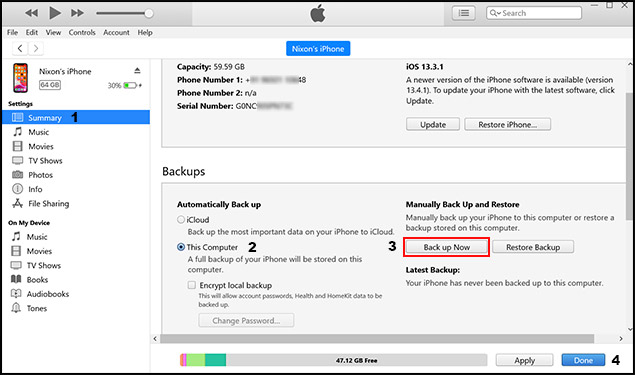
Before connecting iPhone to your computer, it is essential that you temporarily turn off the iCloud backup and passcode on your iPhone. You can turn off the iCloud backup by going to Settings > Your Apple Profile > iCloud. To turn off the passode on your iPhone, go to Settings > Touch ID/Face ID & Passcode and tap on "Turn Passcode Off" option.
Please also make sure that iTunes software has been installed on your computer. If you don't have it on your Windows PC, then you can download it from this page: https://www.apple.com/itunes/
Step 8: Connect iPhone to your computer via lightning cable
We are now all set to re-launch the program and connect iPhone to our computer via USB cable. After connecting the program, please follow the on-screen instructions and the software will detect your iPhone and display it on its UI.
Optional (when program doesn't detect your iPhone): If the software is having trouble recognising your iPhone, then you need to backup your iPhone with the iTunes software. To do this, connect your iPhone to your computer via USB cable and launch the iTunes. In iTunes, you need to click on the small iPhone icon displaying in the upper left corner to go to the "Summary" tab. In the "Backups" section, select "This Computer" and the backup will start automatically.
Step 9: Transfer Viber messages from database to your iPhone
Lastly, you need to right-click on the database you have created in step 6 and select "Transfer Viber Messages from Database to iPhone" option or select the database and click "Transfer Messages from Database to iPhone" button. Your Viber messages will then start to transfer from your old Android phone to your new iPhone. Enter your Apple ID and password after your iPhone gets restarted and you're good to go.
Download Free Version of Android Viber to iPhone Transfer
Buy Full Version of Android Viber to iPhone Transfer ($19.95)
Mac OS Version
![]()
Awards & Accreditations